Security Settings | Product Documentation
In the Security Settings Section, you have various options to configure your server’s security settings as per your requirements.
You have the flexibility to change the SSH Port and Redis Password to any preferred values, providing flexibility and customization. Furthermore, you have the ability to toggle login via Root and Password, as well as enable or disable Security Updates and set their scheduling as needed.
Change SSH Port:
By default, the SSH port on Linux systems is 22. However, you can change the SSH port on your server. It’s a good practice to change the SSH port to enhance security. If someone tries to brute-force the default SSH port, they won’t find the SSH service running.
There are 65,535 ports in a Linux system, and you can use any of them as long as no other service is using it. By using a random SSH port, you can significantly reduce the number of login attempts on your server. It also makes it harder for attackers to find the SSH port.
With ServerKade, you can easily change the SSH port on your server from the Security Settings Section.
Change Redis Password:
Redis is a high-performance key-value store that can be used for various purposes. In practice, it can be utilized as an object caching system for WordPress. There are several WordPress plugins that allow you to connect Redis with WordPress for caching.
We install and configure Redis when you connect your server with ServerKade. We also set a strong password and email it to you. You can change or view the Redis password in the server panel at Security Settings section.
Enable Root login:
The “root” user in a Linux system has all permissions everywhere, making it the most powerful user on the server. If you log in as a “root” user, the system will not even ask you to confirm your identity with a password. As such, no one should be able to access the server as a “root” user, except in some cases.
If you use ServerKade to manage your servers, you can easily turn on/off root access on your server by doing changes in Security Settings section.
Enable Password Login:
When you provide SSH/SFTP details to your clients or developers, they can access SSH/SFTP with a password or an SSH key.
Using an SSH key is highly recommended, as it is much more secure compared to using passwords. This means you can turn off password access on your server if you wish. You can also re-enable it whenever you want by just enable/disable it from Security Settings.
Enable Security updates:
System updates are regular updates for the packages installed on the server and the operating system itself. They also include security updates that are very important.
ServerKade allows you to turn on/off automatic system updates, as well as manage the frequency of updates.
You can simply enable Security Updates and also set a schedule for security updates.
You can set the security updates on every 12 hours, Daily, Weekly and Monthly basis also you can set the custom value as per your requirements.
By Following the below given steps you can change the security settings of your system:
Step 1: First, log in to the ServerKade Account.
Step 2: Click on the Dashboard button for the server you want to change the general settings for.

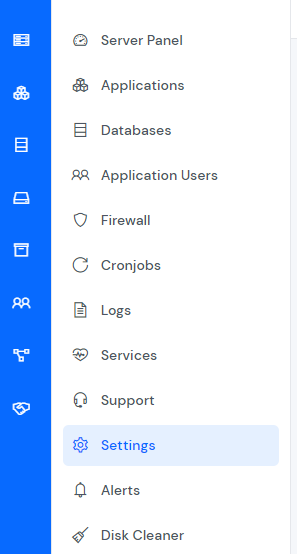
Step 3: In the left-hand sidebar of the server panel, click on Settings.

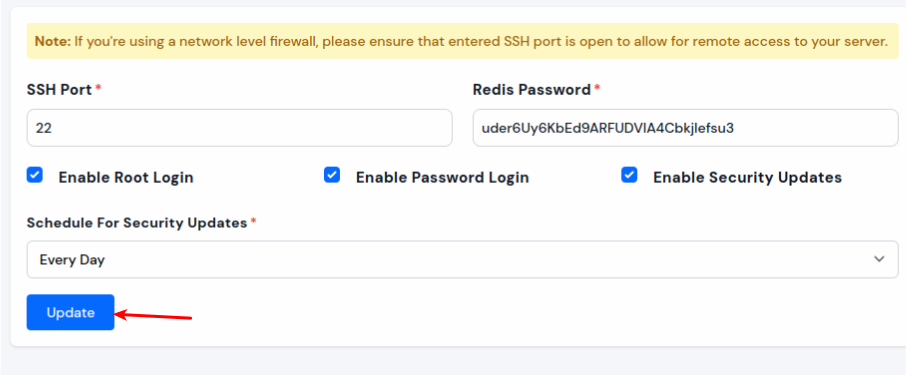
Step 4: Now, you will see the Settings form as shown in the image below.

Step 5: You have the option to modify the SSH Port, Redis password, Enable/Disable Root Login, Enable/Disable Password Login and Enable/Disable Security Updates by adjusting their values in the Security Settings, as illustrated in the image below. After making your changes, simply click the Save button to apply them.


